
Hardwood floors are one of the few parts of a home that can look better with age, but only when their protective finish is in good shape. Years of foot traffic, pet claws, sliding chairs and sunlight slowly wear that finish away. The wood turns dull or gray, scratches collect dirt, and spills start soaking into bare boards instead of sitting on top.
The good news: you rarely need to tear out a tired wood floor. Refinishing removes the worn surface, repairs most cosmetic damage and adds fresh protection for a fraction of the cost of new flooring in Dubai. It also brightens the room and can make your home more appealing to buyers.
If you have been wondering how to refinish hardwood floors yourself, this guide covers everything you need: the tools and materials, each step from preparing the room to sealing the wood, plus safety advice, common mistakes and simple ways to keep your floors looking new for years.
Signs Your Hardwood Floors Need Refinishing
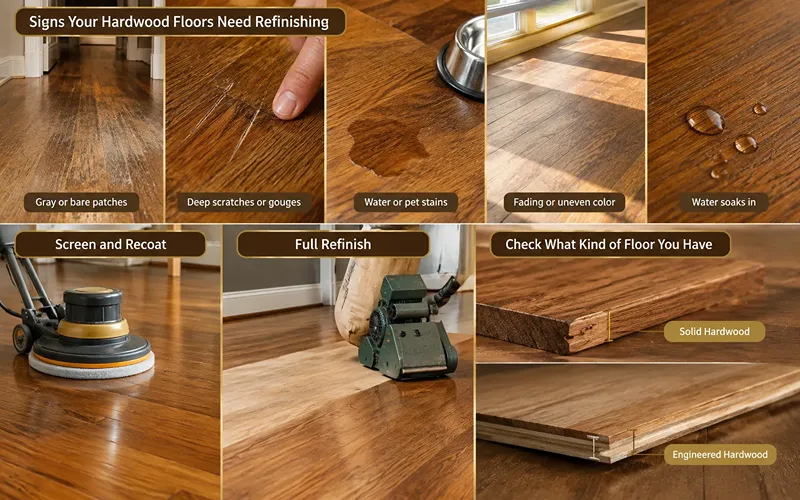
Not every dull floor needs a full sanding. Look for these signs first:
- Gray or bare patches in hallways, doorways and in front of the sink, where the finish has worn through.
- Deep scratches or gouges that you can catch with a fingernail.
- Water or pet stains that cleaning cannot remove.
- Fading or uneven color from years of direct sunlight.
- Water soaks in. Drip a few drops of water on a worn area. If they bead up, the finish is still working. If they darken the wood within a few minutes, the protection is gone.
Full Refinish or Screen and Recoat?
If your wooden flooring is dull and lightly scratched but the wood itself is undamaged, a screen and recoat may be enough. This means lightly abrading the existing finish with a buffer and applying one or two fresh coats. It is faster, creates far less dust and removes almost no wood.
A full refinish, which sands down to bare wood, is the right choice when you see bare spots, deep damage or stains, or when you want to change the floor’s color. That full process is what the rest of this guide covers.
Check What Kind of Floor You Have
Before you sand anything, find out how thick your wood is. Remove a floor vent or look at a threshold to see the edge of a board. Solid hardwood (usually ¾ inch thick) can be sanded many times. Engineered hardwood has only a thin top layer of real wood, and some products can be sanded once or not at all. If the wear layer looks thinner than about 2 mm, talk to a professional before renting a sander.
Tools and Materials for Refinishing Hardwood Floors
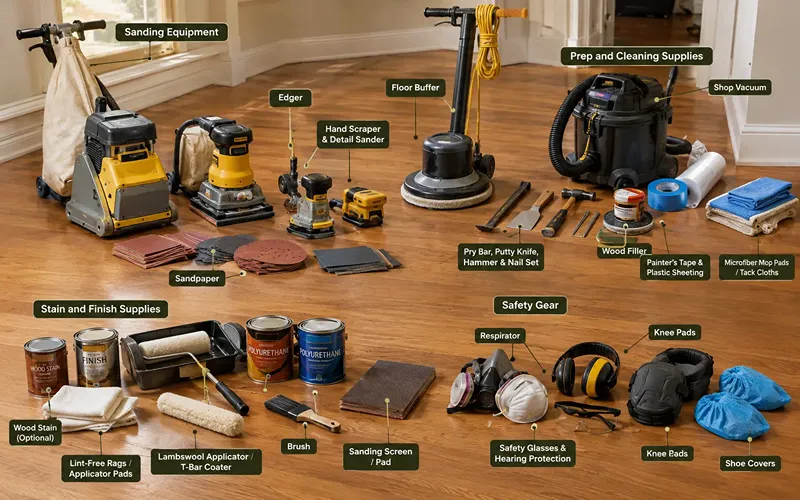
You can rent the heavy equipment from most tool rental shops.
Sanding Equipment
- Drum sander or orbital floor sander. A drum sander removes old finish quickly but can gouge the floor if handled poorly. A large orbital (square-pad) floor sander is slower but much more forgiving, which makes it a smart choice for first-timers.
- Edger for the strip along the walls the big sander cannot reach.
- Hand scraper and detail sander for corners, under radiators and around door casings.
- Sandpaper in several grits, usually 36 or 40, 60, 80 and 100. Buy more than you think you need; most rental shops let you return unused paper.
- Floor buffer with fine screens (optional) for blending sanding marks and scuffing between coats.
Prep and Cleaning Supplies
- Pry bar, putty knife, hammer and nail set
- Wood filler that matches your floor color
- Painter’s tape and plastic sheeting
- Shop vacuum with a fine-dust or HEPA filter
- Microfiber mop pads or tack cloths
Stain and Finish Supplies
- Wood stain (optional) and lint-free rags or applicator pads
- Floor finish, such as oil-based polyurethane, water-based polyurethane or hardwax oil
- Lambswool applicator or T-bar coater for large areas
- Good-quality brush for cutting in along the edges
- 220-grit sanding screen or pad for light sanding between coats
Safety Gear
- Respirator (a dust mask for sanding; an organic vapor cartridge respirator for oil-based products)
- Safety glasses and hearing protection
- Knee pads
- Shoe covers, so you do not track grit onto wet finish
How to Refinish Hardwood Floors: Step by Step
Plan for three to five days for an average room. Sanding usually takes a day, and the rest of the time goes to drying between coats.
Step 1: Prepare the Room
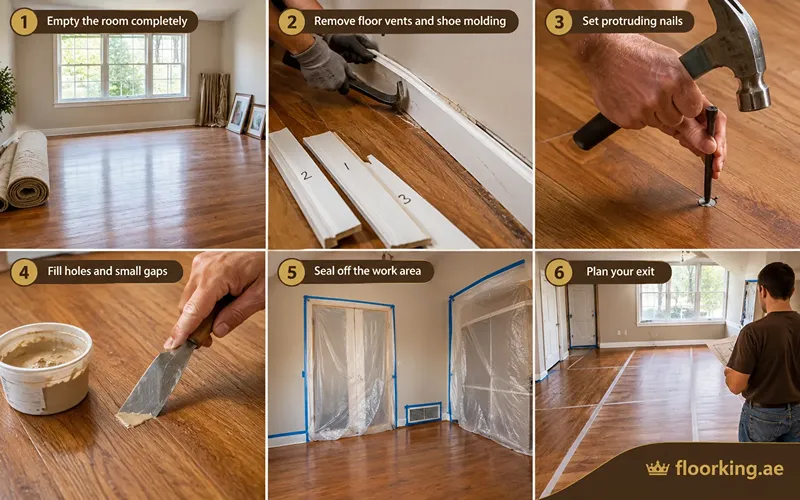
- Empty the room completely, including rugs, curtains that reach the floor and wall hangings near the floor.
- Remove floor vents and shoe molding. Pry the molding off gently and number each piece on the back so it goes back in the same place.
- Set protruding nails. Use a nail set to push nail heads about 1/8 inch below the surface. A single raised nail can tear sandpaper and scar the floor.
- Fill holes and small gaps with wood filler and let it dry.
- Seal off the work area. Tape plastic over doorways, closets and built-in cabinets, and cover air vents. Turn off your heating or cooling system so it does not spread dust through the house.
- Plan your exit. Decide where you will finish each coat so you never trap yourself in a corner.
Step 2: Sand the Floor
Sanding is the most important part of hardwood floor refinishing. The goal is to remove all the old finish and leave flat, evenly scratched wood that will take stain and finish uniformly.
Work through the grits in order, never skipping more than one:
| Pass | Typical grit | Purpose |
| First cut | 36 or 40 | Removes old finish, stains and minor unevenness |
| Second cut | 60 | Removes the deep scratches from the first pass |
| Third cut | 80 | Smooths the surface further |
| Final cut | 100 (or 120 for water-based finish) | Leaves a fine, even scratch pattern |
If the floor is in fairly good shape, try starting with 60 grit on a small area first. Use the finest grit that removes the finish without clogging the paper.
Technique matters:
- Always sand with the grain, in long, straight passes.
- With a drum sander, start the machine with the drum raised, then lower it gently while already moving forward. Raise it again before you stop. If the drum sits still on the floor for even a second, it will dig a dip.
- Overlap each pass by a few inches and keep a steady walking pace.
- Change the paper as soon as it stops cutting well. Dull paper burnishes the wood instead of sanding it.
Step 3: Sand the Edges and Corners
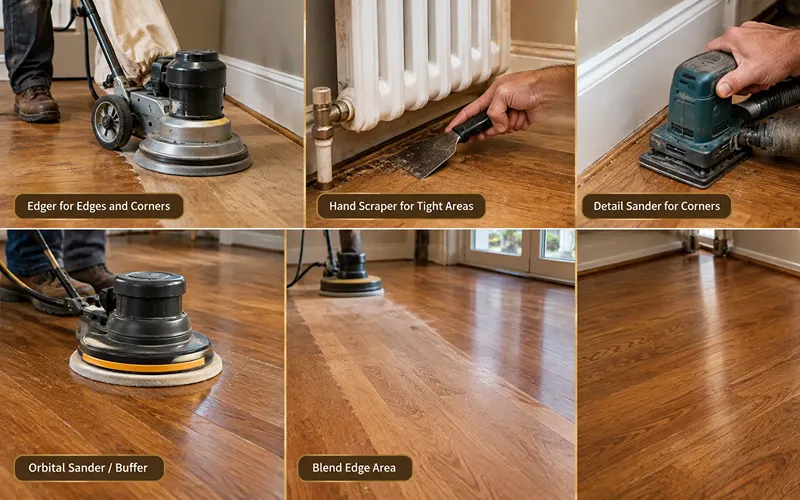
Once the main area is done with a given grit, run the edger around the perimeter using the same grit. Keep it moving in smooth arcs and let the machine’s weight do the work. Pressing down leaves swirl marks.
Finish tight corners and areas under radiators with a sharp hand scraper, always pulling with the grain, then smooth them with a detail sander. On the final grit, use the large orbital sander or a buffer to blend the edge area into the main floor so you do not see a visible “picture frame” after staining.
Step 4: Remove Every Bit of Dust
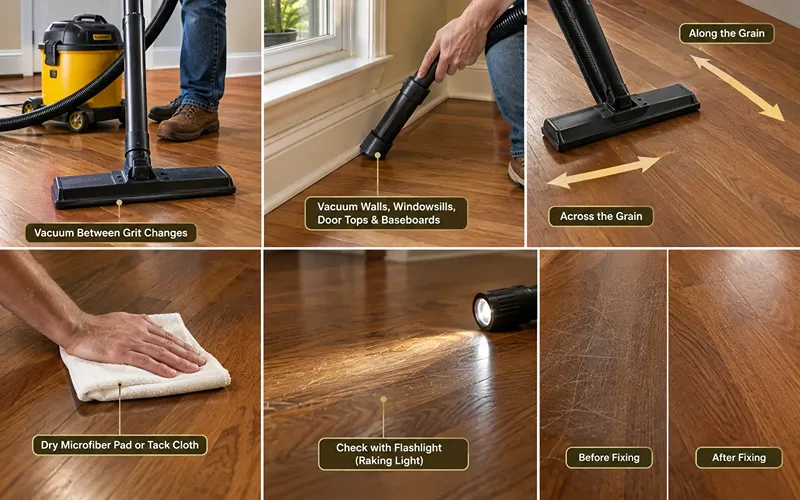
Dust is the number-one cause of a rough, gritty finish.
- Vacuum between every grit change, not just at the end. Leftover coarse grit can scratch the floor during the next pass.
- After the final sanding, vacuum walls, windowsills, door tops and baseboards, since dust settles down from these surfaces.
- Vacuum the floor along the grain, then across it to pull dust out of the gaps between boards.
- Wipe the floor with a dry microfiber pad or tack cloth. When you slide a clean white cloth across the boards and it comes up clean, you are ready.
Before staining, shine a flashlight low across the floor. Raking light reveals swirls and scratches that are invisible from above. Fix them now, because stain will make them stand out.
Step 5: Apply Stain (Optional)
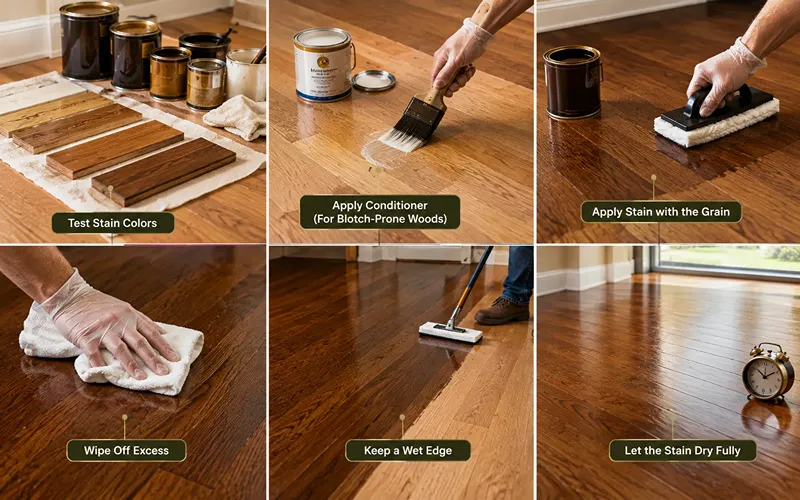
Staining hardwood floors is optional; many people keep the natural color. If you want a new shade:
- Test first. Try two or three colors on a sanded spot inside a closet or on a leftover board sanded to the same final grit. Let them dry and look at them in daylight.
- Use conditioner on blotch-prone woods such as maple and birch, or the color may come out patchy.
- Work in small sections, about three to four boards wide, moving toward your exit.
- Apply with the grain using a rag or applicator pad, wait the time listed on the can, then wipe off all excess. Stain left sitting on the surface will not dry properly and can cause the finish to peel.
- Keep a wet edge so sections blend without lap marks.
- Let the stain dry fully before sealing. Dry time ranges from a few hours to a full day depending on the product and humidity, so follow the label.
Step 6: Seal the Wood with a Protective Finish
The finish is what protects your floor from daily wear. Choose the type that suits your home:
| Finish | Look | Dry time between coats | Best for |
| Oil-based polyurethane | Warm, amber tone that deepens over time | Long (often overnight) | Durability and a traditional look |
| Water-based polyurethane | Clear, does not yellow much | Short (often a few hours) | Light woods, low odor, faster projects |
| Hardwax oil | Natural, low-sheen, soaks into the wood | Varies by brand | A matte look and easy spot repairs |
How to apply polyurethane:
- Stir the finish gently. Never shake it, because shaking creates bubbles.
- Cut in along the walls with a brush, about one room section at a time.
- Pour a thin line of finish and spread it with a lambswool applicator or T-bar in long strokes along the grain.
- Apply thin, even coats. Thick coats dry slowly, trap dust and often wrinkle.
- Work toward your exit and keep a wet edge.
- Once a coat is dry, lightly sand or screen it with 220 grit, vacuum, and tack the floor before the next coat. This improves adhesion and removes dust nibs.
Most floors need three coats of finish. Water-based products may need a fourth coat in busy areas. Always check the manufacturer’s recoat window.
Step 7: Let the Finish Cure
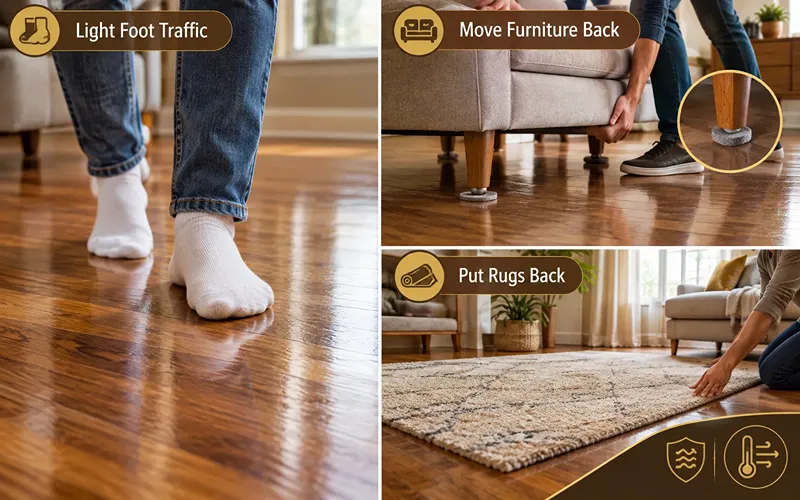
A finish can be dry to the touch long before it is fully hard. A general timeline looks like this, but your product label has the final say:
- About 24 hours: light foot traffic in socks.
- Several days: move furniture back in, using felt pads and lifting rather than sliding.
- Two to four weeks: put rugs back down, once the finish has fully cured.
Keep the room at a moderate temperature with good airflow during this time.
Safety Precautions
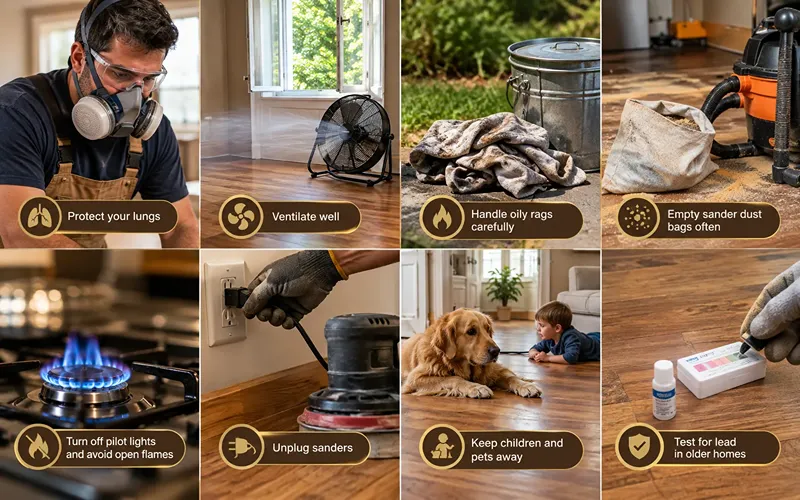
Refinishing involves heavy machinery, fine dust and flammable products, so follow these rules:
- Protect your lungs. Wear a properly fitted respirator while sanding and when using solvent-based products.
- Ventilate well. Open windows and use a fan blowing outward, but avoid blowing dust onto wet finish.
- Handle oily rags carefully. Rags soaked in oil-based stain or finish can heat up and catch fire on their own. Lay them flat outdoors to dry, or put them in a sealed metal container filled with water.
- Empty sander dust bags often and dispose of the dust outside. Fine wood dust is flammable.
- Turn off pilot lights and avoid open flames when using oil-based products.
- Unplug sanders before changing paper.
- Keep children and pets away until the finish has fully cured.
- Test for lead in older homes. In houses built before 1978, old floor finishes may contain lead. Test before sanding.
Common Mistakes to Avoid
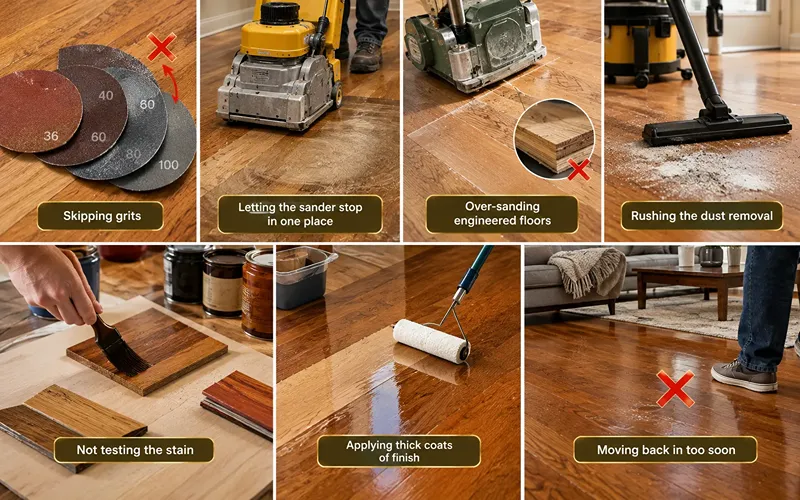
- Skipping grits. Jumping from 36 to 100 grit leaves deep scratches that show through the finish.
- Letting the sander stop in one place. This creates dips and chatter marks that are hard to fix.
- Over-sanding engineered floors. You can sand right through the thin wear layer.
- Rushing the dust removal. Dust trapped in the finish feels rough and looks cloudy.
- Not testing the stain. The color on the can rarely matches the color on your wood.
- Applying thick coats of finish. More coats of thin finish beat fewer thick ones.
- Moving back in too soon. Furniture and rugs can dent or mark a finish that has not cured.
Practical Tips for Better Results
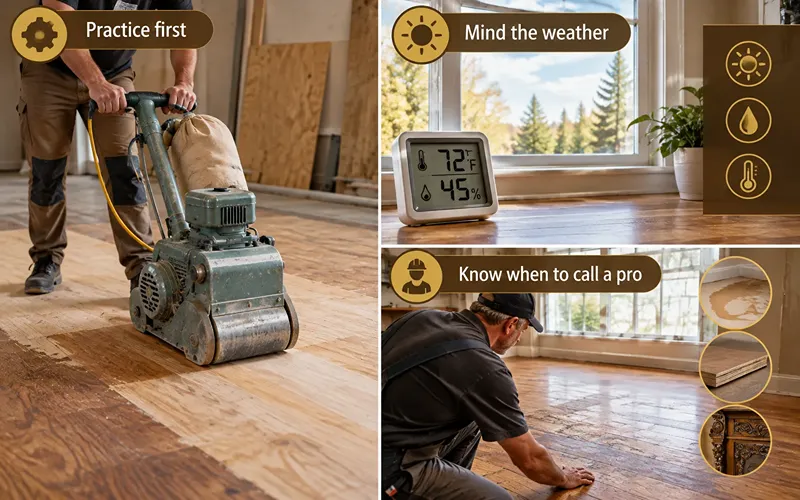
- Practice first. Spend a few minutes running the rented sander on a sheet of plywood before touching your floor.
- Mind the weather. Pick a stretch of mild, dry days. Most finishes perform best in moderate temperatures, often around 65 to 80°F (18 to 27°C).
- Know when to call a pro. Severe water damage, thin engineered floors, valuable antique wood or a very large area may be worth hiring an experienced refinisher.
How to Maintain Refinished Hardwood Floors
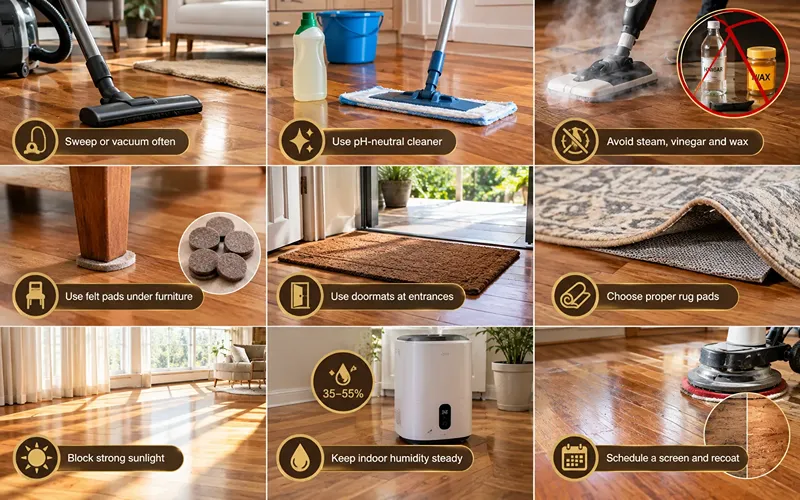
Simple daily care stretches the time between refinishing projects:
- Sweep or vacuum often using a soft brush or hard-floor setting to remove grit that acts like sandpaper.
- Clean with a pH-neutral hardwood cleaner and a damp (not wet) microfiber mop.
- Avoid steam mops, vinegar solutions and wax on polyurethane floors.
- Put felt pads under furniture and replace them when they wear down.
- Use doormats at every entrance to trap dirt and moisture.
- Choose rug pads made for hardwood, as some rubber backings can discolor the finish.
- Block strong sunlight with curtains or UV-filtering film to reduce fading.
- Keep indoor humidity steady, roughly 35 to 55 percent, to reduce gaps and cupping.
- Schedule a screen and recoat every few years in high-traffic areas, before wear reaches the bare wood.
Conclusion
Learning how to refinish hardwood floors is one of the most rewarding home projects you can take on. The process comes down to a few key steps: prepare the room carefully, sand through the grits in order, clean the edges and corners, remove every trace of dust, apply stain if you want a new color, and seal the wood with thin, even coats of finish. Give the finish time to cure, follow the safety rules, and protect your floors with simple daily care. Do that, and your refinished hardwood floors will look beautiful and stay protected for many years to come.
Frequently Asked Questions
How long does it take to refinish hardwood floors?
For a typical room, plan on three to five days including sanding, staining and drying time between coats. Full curing takes up to a few weeks.
Can you refinish hardwood floors without sanding?
If only the finish is worn and the wood is undamaged, you can use a screen and recoat or a chemical abrasion kit to refresh the surface without sanding to bare wood. Deep scratches, stains and color changes still require full sanding.
How many times can hardwood floors be refinished?
Solid hardwood can usually be sanded many times over its life. Engineered hardwood depends on the thickness of its top layer and may allow only one or two refinishes.