
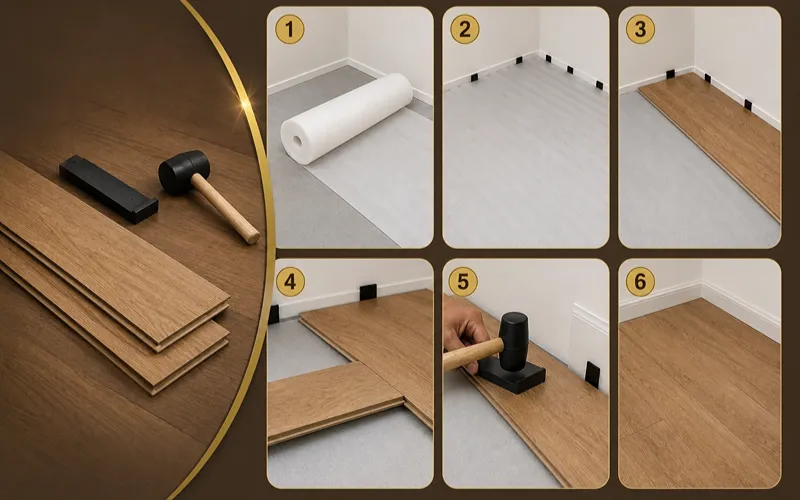
Laminate flooring has become one of the go-to choices for homeowners who want the warm, natural look of hardwood without the price tag or the maintenance headaches. It clicks together, floats over almost any subfloor, and, best of all, it’s a project most people can tackle themselves over a weekend. No glue, no nails, no professional crew required.
If you’ve never installed laminate flooring before, the process can feel intimidating at first glance. But once you understand the logic behind it (measure, prep, acclimate, click, repeat), it really does come together like a giant puzzle. This guide walks you through every stage of laminate flooring installation: the tools and materials you’ll need, how to prepare your room, the step-by-step installation process, and the small details that separate an amateur job from professionally installed laminate flooring that looks flawless.
Tools You’ll Need
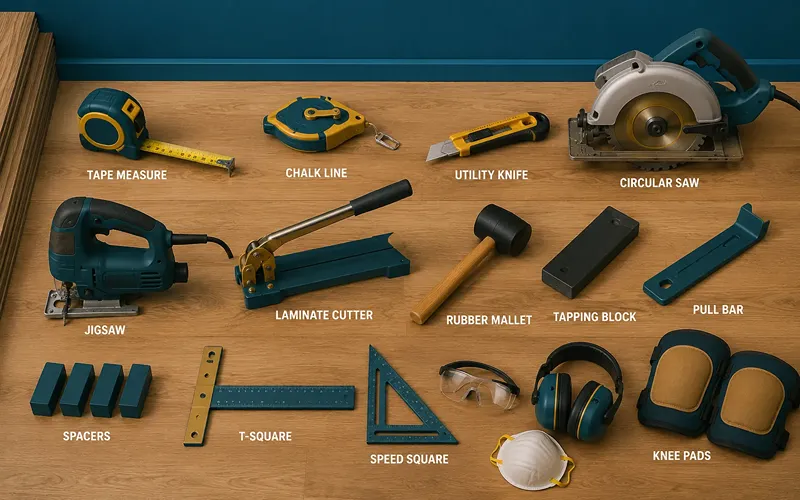
Before you touch a single plank, lay out your tools so you’re not running to the hardware store mid-project. Most of these are inexpensive, and many flooring retailers sell installation kits that bundle the specialty items together.
- Tape measure: To calculate square footage and plank layout
- Chalk line: To mark a straight guideline for your first row
- Utility knife: For trimming underlayment and vapor barrier sheeting
- Circular saw, jigsaw, or a dedicated laminate cutter: For straight and detail cuts
- Rubber mallet: To gently seat planks without damaging the edges
- Tapping block: Protects the plank’s tongue while you tap rows together
- Pull bar: Locks the last plank in a row tight against the wall
- Spacers: Hold a consistent expansion gap around the room’s perimeter
- T-square or speed square: Keeps your cuts accurate
- Knee pads: You’ll be on the floor for hours, so save your knees
- Eye protection, ear protection, and a dust mask: Especially important when cutting with power tools, since wood dust is a known respiratory irritant
Materials You’ll Need For Laminate Flooring Installation
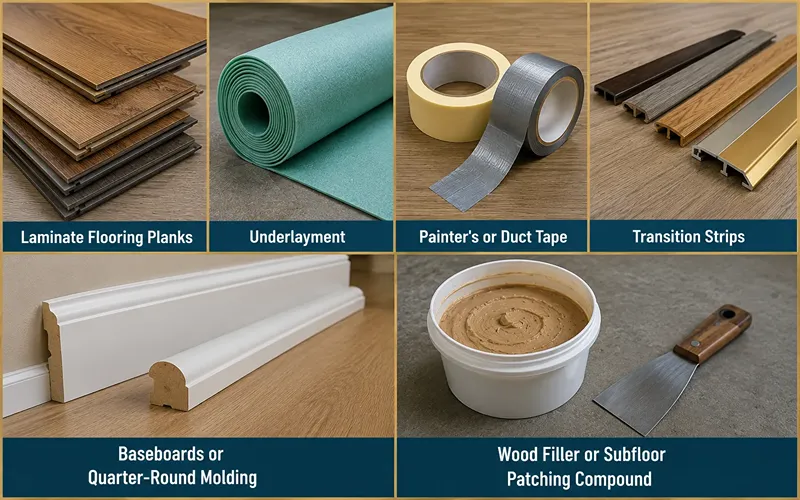
- Laminate flooring planks (add roughly 7-10% extra for cuts, waste, and future repairs)
- Underlayment (foam, cork, or felt, choose one with a built-in vapor barrier for below-grade rooms, basements, kitchens, and bathrooms)
- Painter’s or duct tape, to secure underlayment seams
- Transition strips for doorways and thresholds between rooms
- Baseboards or quarter-round molding to conceal the expansion gap
- Wood filler or subfloor patching compound, if your subfloor needs leveling
Step 1: Prep the Room and Subfloor
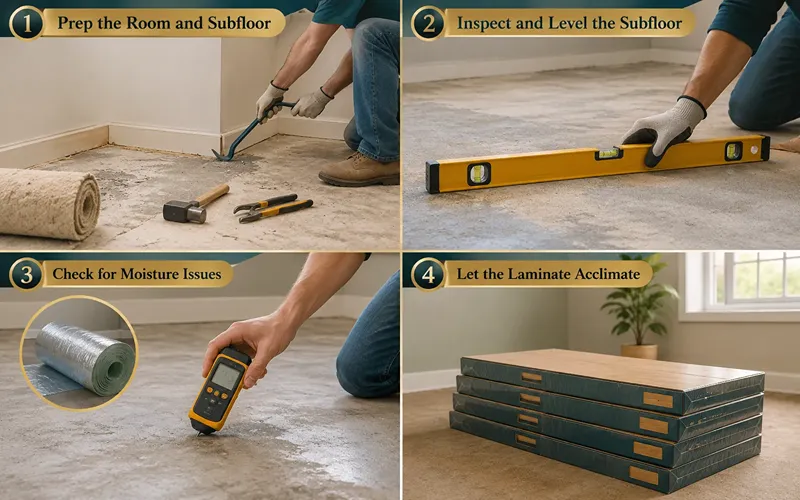
A laminate floor is only as good as the surface it sits on, so don’t rush this stage.
Remove the old flooring and trim. Pull up carpet, vinyl, or old flooring, and use a pry bar to carefully remove baseboards so you can reuse or replace them later. Pull any leftover staples or nails from the subfloor with pliers, then vacuum thoroughly.
Inspect and level the subfloor. It needs to be clean, dry, flat, and free of debris. Fill dips or cracks in a concrete subfloor with a patching compound, and sand down any high spots. For a wood subfloor, replace damaged boards and hammer down protruding nails.
Check for moisture issues. This step gets skipped often, but it matters, trapped moisture underneath a floating floor is one of the most common causes of warping down the line. If you’re installing over concrete or in a humid area like a basement or bathroom, a moisture-resistant underlayment with an integrated vapor barrier is worth the extra cost.
Let the laminate acclimate. Leave the unopened boxes in the room where they’ll be installed for at least 48 hours. This gives the material time to adjust to the room’s temperature and humidity, which significantly reduces the risk of the boards expanding, contracting, or buckling once they’re down.
Step 2: Lay the Underlayment
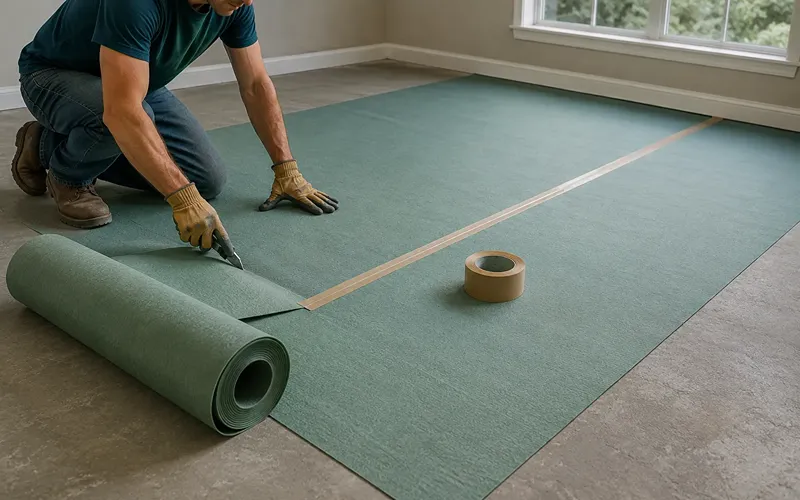
Roll out your underlayment in strips across the room, trimming it to size with a utility knife as you go. The edges should meet snugly but never overlap, an overlapping seam creates a slight bump that will telegraph through the finished floor. Once a row is positioned, run tape along the seam to hold it in place and preserve the vapor barrier if one is included.
Step 3: Plan Your Layout
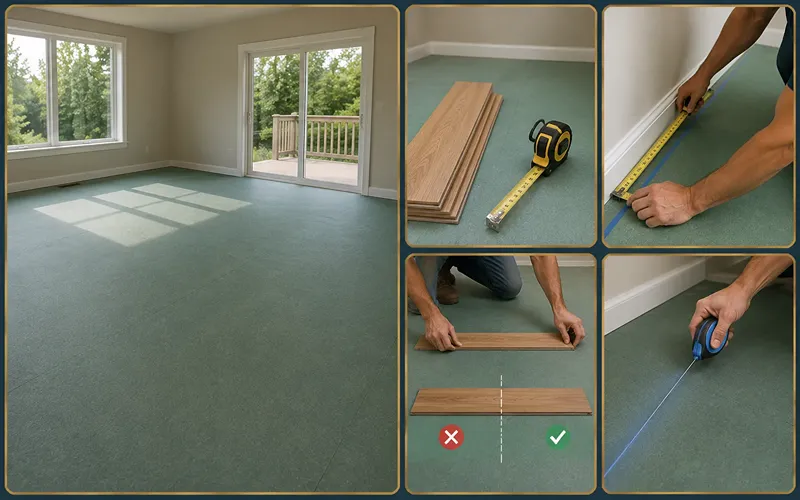
Before locking anything into place, think through the direction and starting point of your first row.
- Planks generally look best running parallel to the main light source, such as a large window or sliding door.
- Choose the longest, straightest wall in the room as your starting wall.
- Measure the width of the room and divide it by the width of a single plank. If the final row would end up narrower than about 2 inches, trim your first row narrower so both the first and last rows are a balanced width.
- Snap a chalk line to guide your first row so it stays perfectly straight, since every following row depends on it.
Step 4: Install the First Row
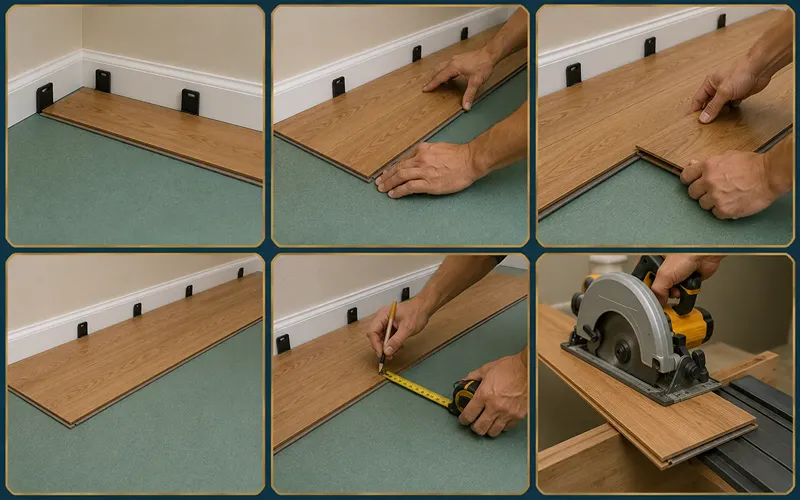
Set spacers, typically ⅜ inch, though you should always check your manufacturer’s spec sheet, along the starting wall to leave room for expansion. Position the first plank in the corner with its tongue side facing the wall, then click the next plank’s groove into it, working left to right along the chalk line. When you reach the end of the row, measure and cut the final plank to fit, leaving the same expansion gap on that side too.
Step 5: Continue Row by Row
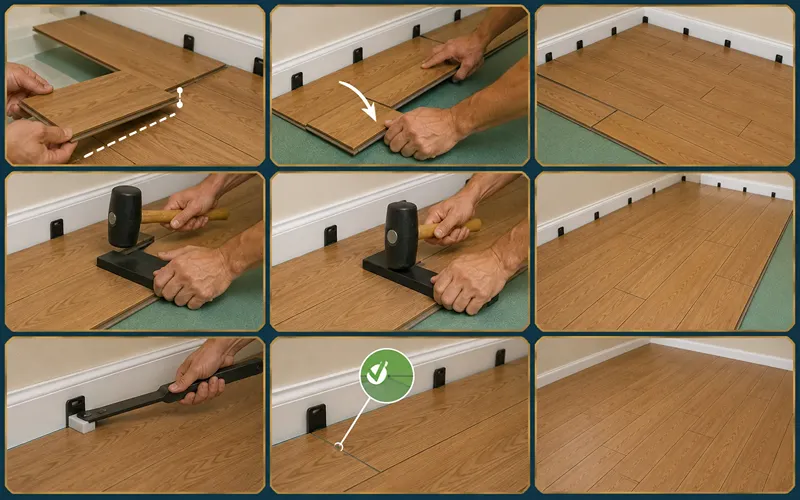
Use the cut-off piece from the end of one row to start the next row, as long as it’s at least 6–8 inches long, this staggers the seams and gives the floor a natural, non-repetitive look while also making it structurally stronger. Angle each new plank into the row before it, then press or gently tap it down with the rubber mallet and tapping block until the seam sits flush. Keep checking that your rows stay straight and that expansion gaps remain consistent along both side walls.
For the last plank in each row, use the pull bar rather than the mallet, it lets you snug the plank tight against the wall without damaging it or the wall itself.
Step 6: Work Around Obstacles
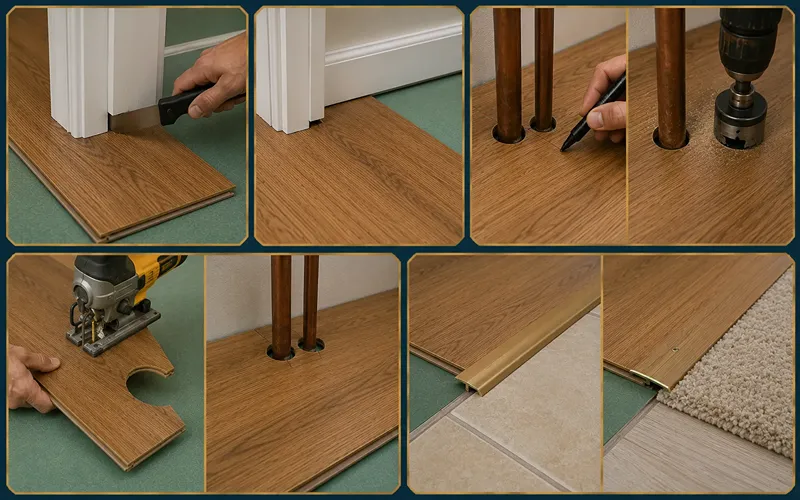
Doorframes, vents, and pipes are where most beginners get nervous, but they’re manageable with the right approach.
- Doorjambs: Use a jamb saw (or a handsaw laid flat) to cut the bottom of the door casing so a plank can slide underneath it cleanly, rather than trying to notch the plank around it.
- Vents and pipes: Trace the outline onto the plank, drill or jigsaw the cutout, and slide the piece into place.
- Transitions between rooms: Where laminate meets another flooring type, or where a room exceeds roughly 25-30 feet in any direction, install a transition strip or an interior expansion joint per the manufacturer’s guidelines.
Step 7: Install the Final Row
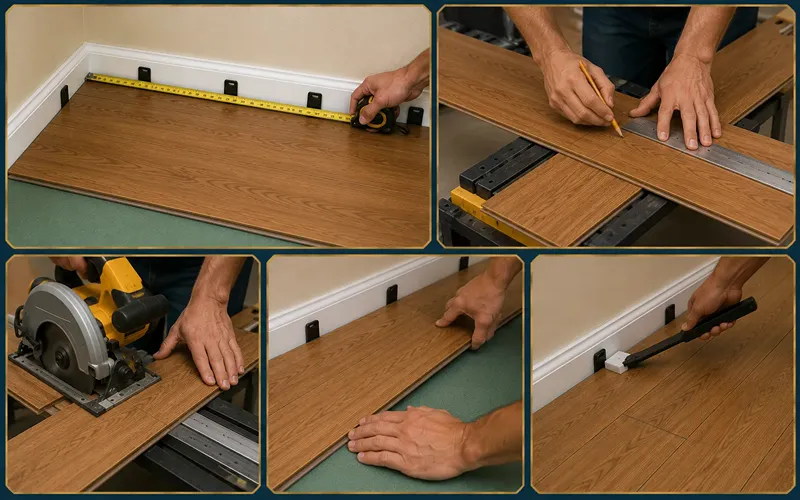
The last row often needs to be ripped down to width. Measure carefully at both ends of the row (walls are rarely perfectly parallel), mark your cut lines, and trim accordingly. Since there’s usually no room to tap this row down normally, use the pull bar to lock it into the previous row and against the spacers.
Step 8: Finishing Touches
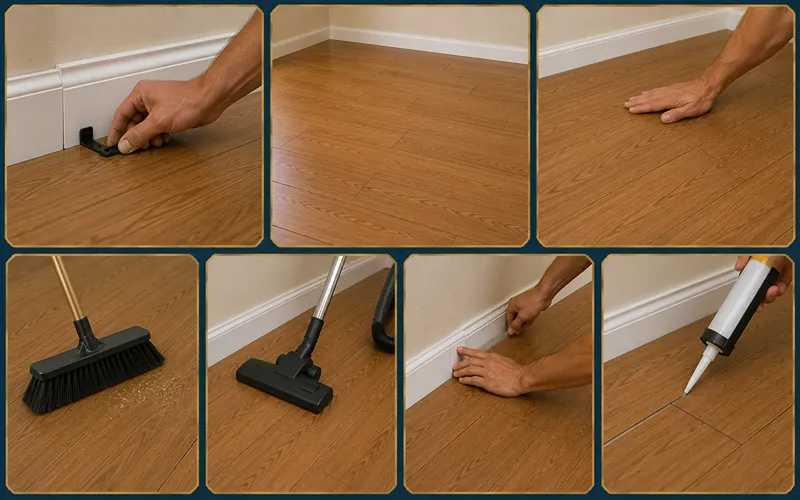
Once every plank is down, remove all the spacers and give the floor a final inspection for gaps, high spots, or loose seams. Sweep or vacuum thoroughly, then reinstall your baseboards or quarter-round molding to hide the expansion gap around the room’s perimeter. If you’re in a moisture-prone room, running a laminate sealant along the seams adds an extra layer of water resistance without gluing the planks together, so the floor can still be lifted later if needed.
How Long Does Laminate Flooring Installation Take?

Timing depends heavily on room size, the number of obstacles (doorways, vents, closets), and how much subfloor prep is needed. As a rough guide:
| Room Size | Estimated Time |
| Small Bedroom | 4-6 Hours |
| Living Room | 1 Day |
| Whole House | 2-3 Days |
Keep in mind these figures assume the subfloor is already in reasonably good shape and don’t include acclimation, which happens before installation day even begins (see the prep steps above). If your subfloor needs leveling or repair, build in extra time for that too.
Common Mistakes to Avoid
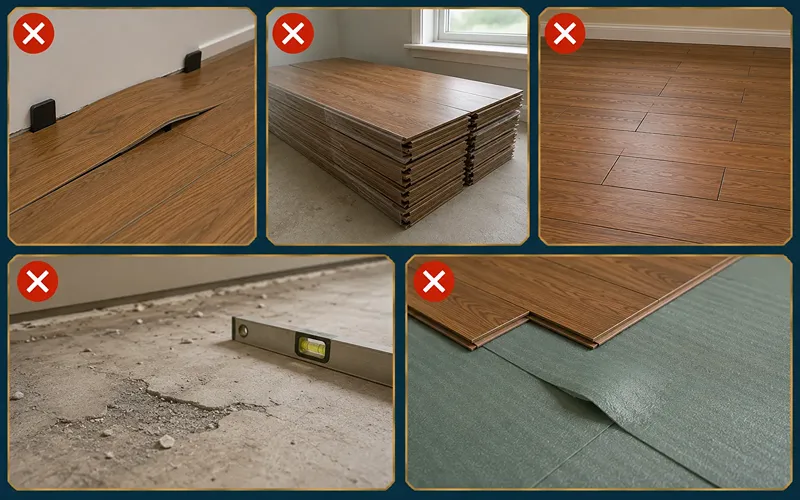
Even careful DIYers run into the same handful of pitfalls:
- Skipping the expansion gap. Without it, humidity and temperature swings have nowhere to go, leading to peaking or buckling months after installation.
- Rushing acclimation. Installing straight out of the box, without letting the planks adjust, is one of the most common causes of post-installation warping.
- Seams that aren’t staggered. Rows with seams lining up too closely look unnatural and weaken the floor’s structure. Keep staggered seams at least 6 inches apart.
- Ignoring subfloor problems. Any unevenness, moisture, or debris left behind will telegraph through the finished floor over time.
- Overlapping the underlayment. This creates subtle ridges that become noticeable (and sometimes audible) once the laminate is down.
How to Care for Your New Laminate Floor
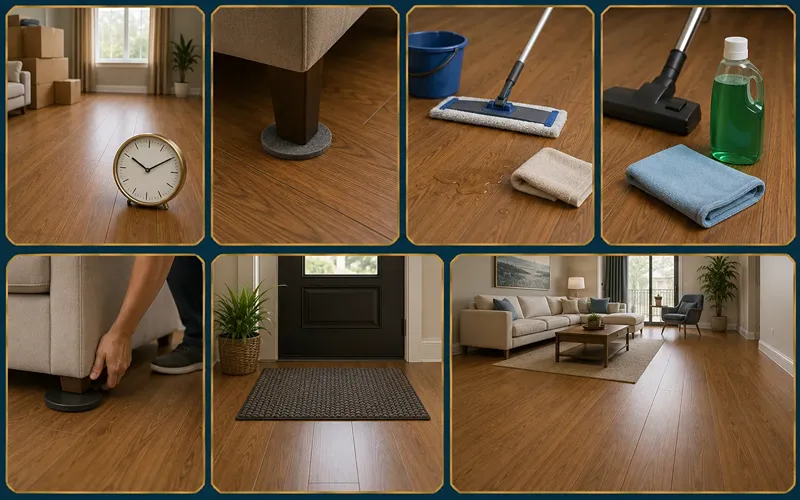
Installing the floor is really only half the job, a little care afterward goes a long way toward keeping it looking new for years.
- Give it time before moving furniture back in. Let the floor settle for at least 24 hours after installation before you drag furniture or heavy items across it, so the planks stay locked and undisturbed while they finish settling.
- Use felt pads under furniture legs. Chairs, tables, and sofa legs can scratch or dent laminate over time. Felt pads (and furniture coasters under heavier pieces) distribute weight and prevent the surface from getting scuffed.
- Avoid excessive water. Laminate is not fully waterproof unless specifically labeled as such, so steer clear of wet mopping, standing water, or steam cleaners. Wipe up spills right away, and use a barely damp mop rather than a soaked one for regular cleaning.
- Stick to the right cleaning routine. Sweep or vacuum (with a hard-floor setting, not a beater bar) regularly to keep grit from scratching the surface. For deeper cleaning, use a cleaner formulated specifically for laminate, regular tile or wood cleaners can leave a residue or dull the finish.
- Use furniture sliders when rearranging. Never drag heavy furniture across the floor. Lift it, or slide it on protective pads, to avoid scratches and gouges.
- Add mats at entryways. Placing mats at doors helps trap dirt, grit, and moisture before it ever reaches the laminate, which is one of the simplest ways to extend the floor’s lifespan.
With these habits, a well-installed laminate floor can easily last 15-25 years without needing refinishing or replacement.
Final Thoughts
Installing laminate flooring rewards patience more than skill. Take the time to prep your subfloor properly, let the planks acclimate, keep your expansion gaps consistent, and stagger your seams, and the rest of the process really is as simple as clicking pieces into place. Clear a weekend, gather your tools, and you’ll end up with a floor that looks like it was installed by a pro, at a fraction of the cost.
Frequently Asked Questions
How long does laminate flooring take to acclimate?
A minimum of 48 hours, though some installers recommend up to 72 hours in humid climates. This happens before you start laying any planks.
How big should the expansion gap be?
Most manufacturers call for around ¼ to ⅜ inch, though larger rooms may need more. Always confirm the exact figure in your product’s installation guide.
Do I need underlayment if my planks already have it attached?
Some laminate comes with an attached foam pad. In that case a separate underlayment usually isn’t required, though a vapor barrier may still be recommended for concrete subfloors.
Can laminate flooring be installed over tile or existing flooring?
Yes, as long as the existing surface is flat, clean, and structurally sound. Very uneven tile grout lines may need a leveling compound or a thicker underlayment first.
Is laminate flooring installation truly a DIY-friendly project?
For the most part, yes. It doesn’t require adhesives or specialized trade skills, patience, the right tools, and careful measuring are really what matter most.


