
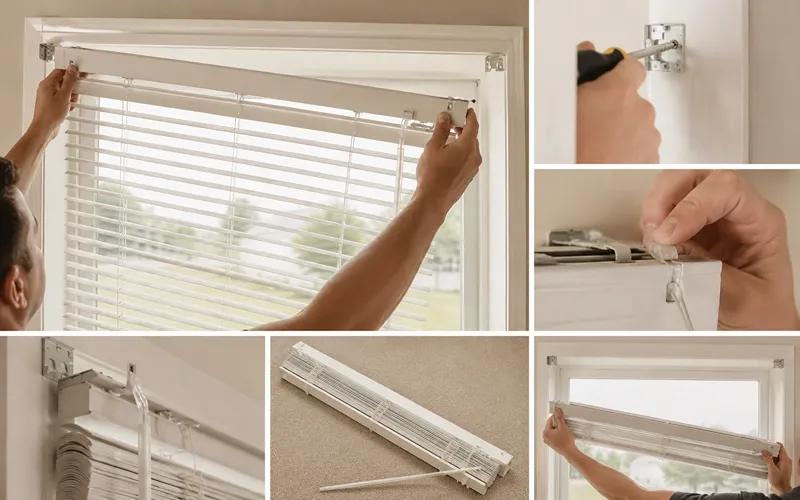
Whether you’re repainting a room, deep-cleaning your window coverings, or replacing old blinds entirely, removing them correctly protects your walls, window frame, and hardware from unnecessary damage.
Most blinds, roller, vertical, venetian, roman, cellular, or motorized, come down using the same basic logic: raise the blinds, locate the bracket, release it, and support the weight as it lifts free. Once you understand how brackets work, removing almost any blind in your home becomes a straightforward task.
This guide by Floor Way covers the exact process for each blind type, the tools you’ll need, and the common mistakes that lead to wall damage or broken hardware.
Tools You’ll Need Before You Start
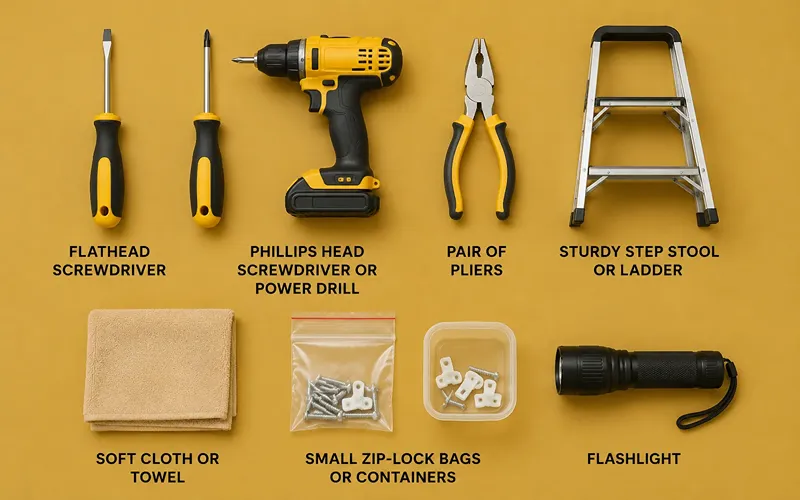
Gathering your tools beforehand keeps you from climbing up and down a ladder ten times mid-task. For most blind removal jobs, you’ll want:
- A flathead screwdriver (for prying open bracket clips)
- A Phillips head screwdriver or a power drill (for mounting screws)
- A pair of pliers (useful for stiff or corroded clips)
- A sturdy step stool or ladder
- A soft cloth or towel to lay on the windowsill
- Small zip-lock bags or containers to keep screws and clips organized
- A flashlight, useful for spotting hidden brackets
Having a second pair of hands nearby is also worth it for wide or heavy blinds, a full-width headrail can be awkward to hold steady with one arm while you’re releasing a bracket with the other.
Know Your Blinds Type Before You Touch a Bracket
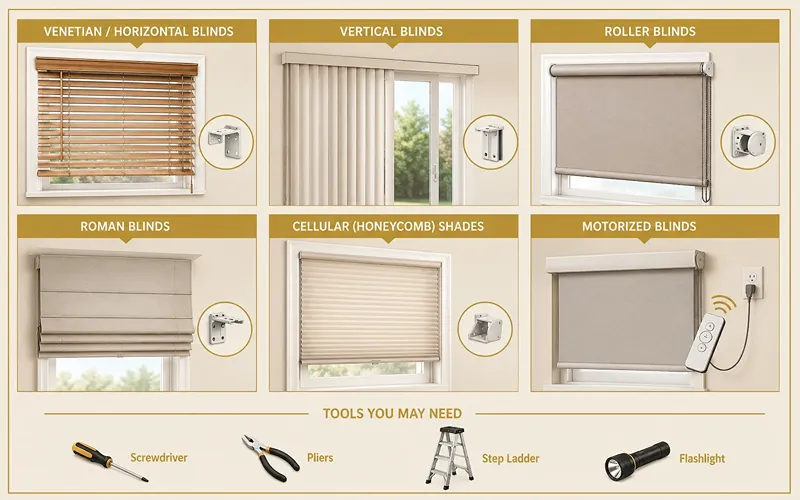
Every blind uses a slightly different bracket and locking system, so identifying what you’re working with first prevents a lot of wasted effort.
- Venetian / horizontal blinds: Slatted blinds (wood, faux wood, or aluminum) that tilt and raise using cords or a wand.
- Vertical blinds: Long hanging slats attached to a top track, typically found on sliding doors and large windows.
- Roller blinds: A single sheet of fabric wound around a tube, held by a chain or spring mechanism on one side.
- Roman blinds: Fabric panels that fold into soft pleats as they’re raised, often ceiling-mounted.
- Cellular (honeycomb) shades: Lightweight, accordion-style fabric shades usually held by simple snap-in brackets.
- Motorized blinds: Any of the above styles, but powered electrically and requiring a safety disconnection step first.
Once you know which category your blinds fall into, the removal steps below apply directly.
Blind Removal Difficulty at a Glance
Before you dive into the steps, here’s a quick look at how each blind type ranks in terms of removal difficulty, handy if you’re short on time or tackling multiple windows at once.
| Blind Type | Difficulty Level |
|---|---|
| Roller | Easy |
| Venetian / Horizontal | Easy |
| Cellular / Honeycomb | Easy |
| Vertical | Medium |
| Roman | Medium |
| Motorized | Hard |
Roller, venetian, and cellular shades tend to use straightforward clip or clamp systems, so most people manage them on the first try. Vertical and roman blinds take a bit more care because of the extra slats or delicate fabric involved. Motorized blinds rank hardest simply because of the added electrical disconnection step, the mechanical part is no harder than a standard roller or venetian blind.
How to Remove Venetian and Horizontal Blinds
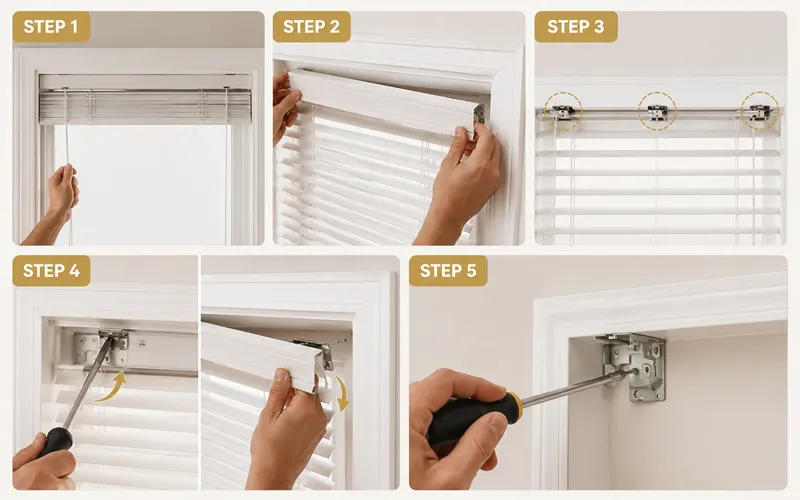
These are among the most common blinds found in homes, and also among the easiest to remove once you know where the release point is.
Step 1: Raise the blinds fully. Pull the lift cord until every slat sits at the top. Removing a blind while the slats hang down adds unnecessary weight and makes the headrail harder to control.
Step 2: Remove any decorative valance. Many horizontal blinds have a front strip that hides the headrail and brackets. It typically snaps off with a gentle squeeze on the plastic clips.
Step 3: Locate the brackets. Check both ends of the headrail, and the middle if it’s a wide window, larger blinds often have a center support bracket too.
Step 4: Release the bracket. For standard fixed brackets, slide a flathead screwdriver under the bracket’s front flap and pry gently upward, then tilt the headrail forward and down to slide it free. For spring-loaded brackets, push the headrail firmly toward the window first to compress the internal spring, then tilt and pull it out while maintaining that inward pressure.
Step 5: Unscrew the brackets from the wall, if you’re not planning to reuse them in the same spot.
How to Remove Vertical Blinds
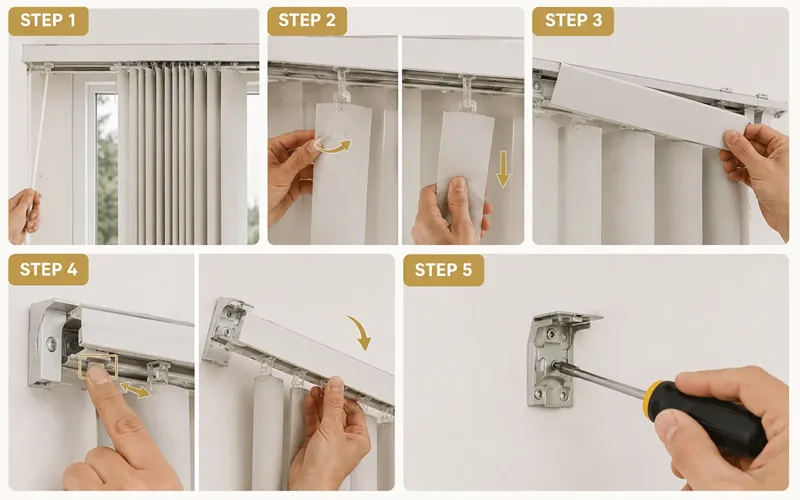
Vertical blinds come apart in two stages, the slats first, then the headrail.
Step 1: Open and rotate the slats to one side using the cord or wand, so they hang flat and out of the way.
Step 2: Detach each slat individually. Every slat clips into a small carrier inside the headrail. Twist the slat gently until it lines up with the track, then pull it down and out. Work end to end rather than pulling slats at random.
Step 3: Remove the valance, if present, by unclipping it from the plastic tabs.
Step 4: Release the headrail. Most vertical blind brackets have a small locking tab. Press or slide it, then lower the headrail out while supporting it with your other hand.
Step 5: Unscrew the wall brackets once the headrail is clear.
How to Remove Roller Blinds
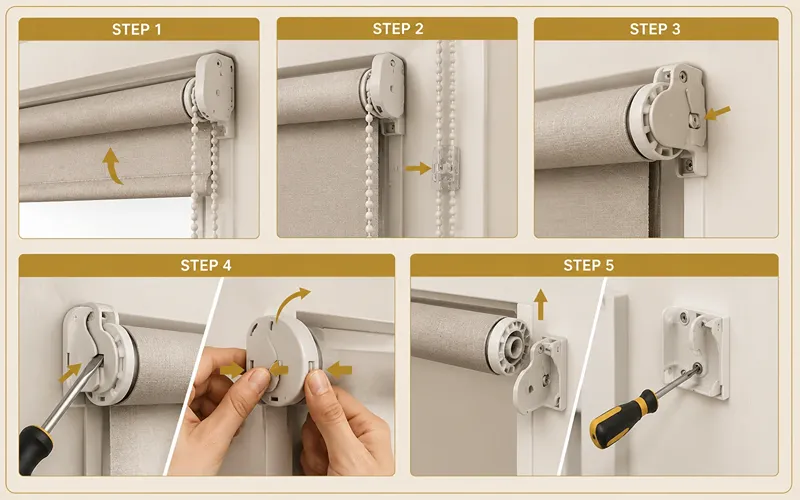
Roller blinds are usually the fastest to remove because there’s only one mechanism to deal with, the safety clamp.
Step 1: Roll the fabric all the way up using the chain or spring, so the tube is fully wound and out of the way.
Step 2: Free the chain, if it’s chain-operated. There’s typically a small clip anchoring the chain loop to the wall or window frame, unclip it first.
Step 3: Find the safety clamp on the end opposite the chain. This piece locks the roller tube in place and prevents it from dropping accidentally.
Step 4: Release the clamp. On basic roller blinds, wedge a flathead screwdriver in and pry it loose. On higher-end models, pinch both sides of the clamp together while rotating the tube slightly to pop it free.
Step 5: Lift the tube out of the remaining bracket, then unscrew both brackets if needed.
How to Remove Roman Blinds
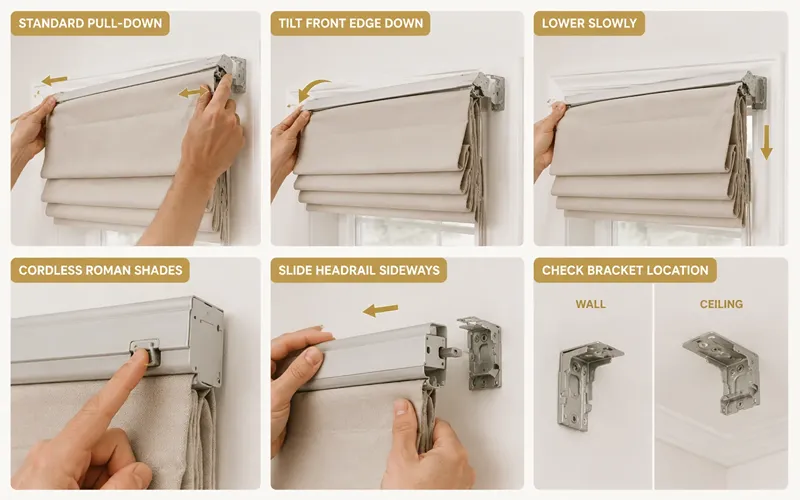
Roman blinds have a softer, more tailored look, but the fabric requires careful handling, it can crease or tear if pulled roughly.
For standard pull-down versions: press the headrail backward at each bracket to release the internal tension, then tilt the front edge down and outward until it comes free. Lower it slowly, don’t let the fabric drop suddenly.
For cordless roman shades: look for a small release button on the back of the headrail. Hold it in while sliding the headrail sideways away from one bracket, then tilt and repeat on the other side.
Once the headrail is off, check whether the brackets are mounted on the wall face or the ceiling before reaching for the screwdriver, Roman shades are frequently ceiling-fixed.
How to Remove Cellular and Honeycomb Shades
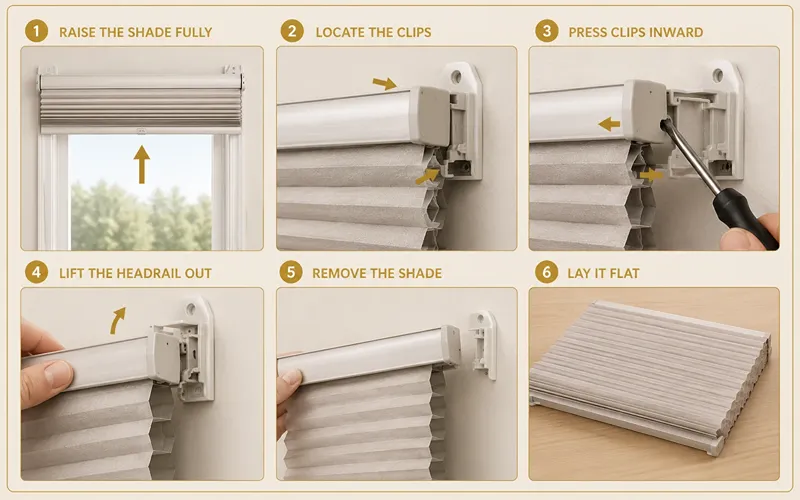
Cellular shades are lighter than most other blind types, and their brackets are usually simple snap-in clips rather than screws. Raise the shade fully, locate the small clips holding the headrail into the bracket, press them inward with your fingers or a flathead screwdriver, and lift the headrail straight out. Because the fabric folds are delicate, avoid squeezing or bending the shade once it’s off, lay it flat rather than rolling it.
How to Remove Motorized Blinds Safely
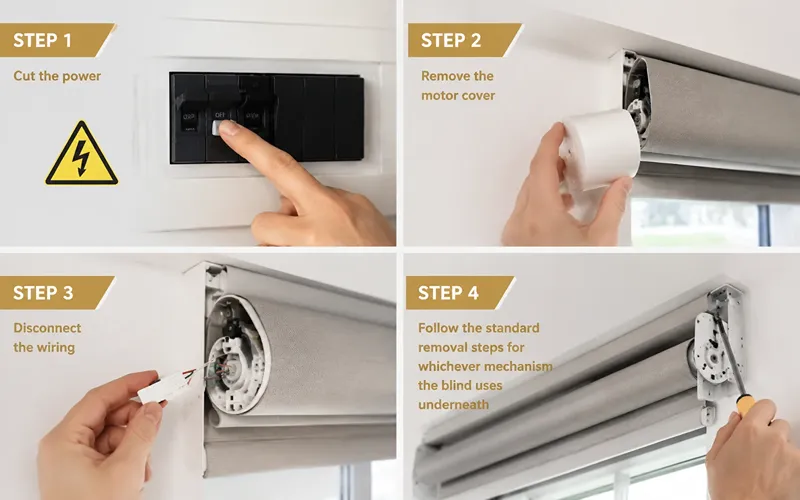
Motorized blinds follow the same mechanical steps as their manual counterparts, but with one non-negotiable extra step at the start.
Step 1: Cut the power. Switch off the breaker controlling the motor, or unplug the unit directly. Never attempt removal while the blind is still connected to electricity.
Step 2: Remove the motor cover, if there is one, these usually unclip or unscrew without much effort.
Step 3: Disconnect the wiring, pulling on the connector plug itself rather than tugging the cable.
Step 4: Follow the standard removal steps for whichever mechanism the blind uses underneath (roller, venetian, etc.).
Dealing With Hidden or Concealed Brackets
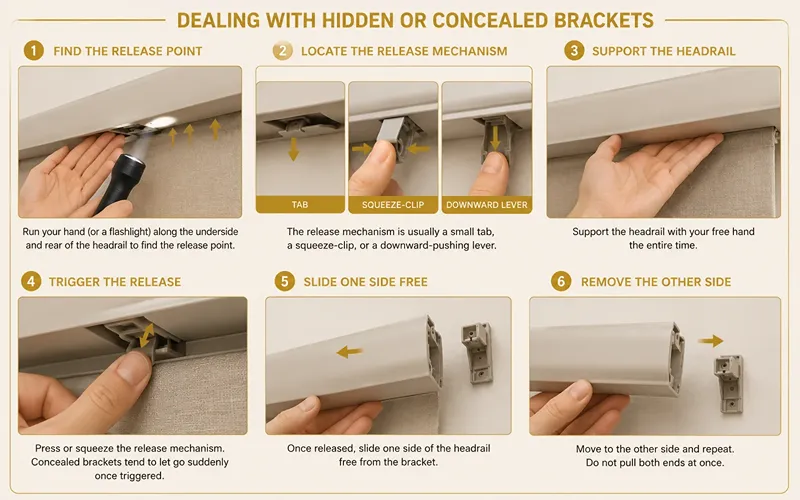
Newer blinds often use hidden brackets for a cleaner, streamlined look, which also makes them a little trickier to remove. Run a hand (or a flashlight) along the underside and rear of the headrail to find the release point, since it’s almost always tucked out of sight rather than on the front face. Once located, the release mechanism is usually a small tab, a squeeze-clip, or a downward-pushing lever. Support the headrail with your free hand the entire time, since concealed brackets tend to let go suddenly once triggered, then slide one side free before moving to the other, rather than pulling both ends at once.
Common Mistakes That Cause Damage
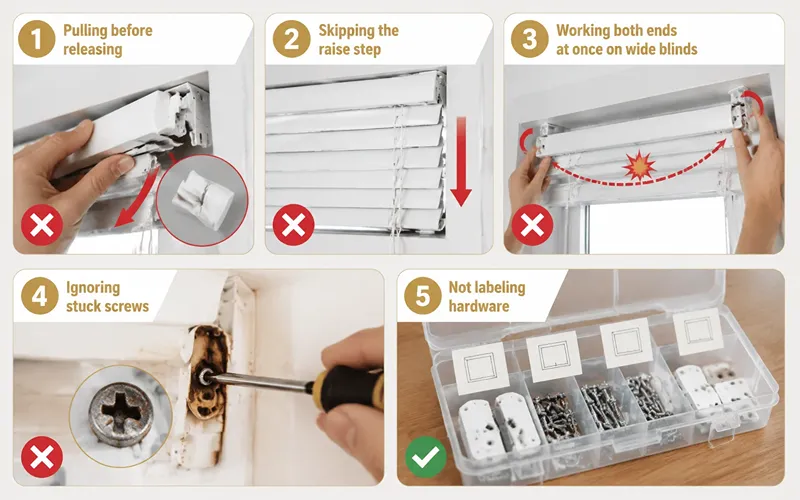
A few habits are responsible for most of the scratched frames and snapped brackets people run into:
- Pulling before releasing. Yanking on a headrail that’s still locked in the bracket is the number one cause of cracked plastic clips.
- Skipping the raise step. Removing a blind with the slats or fabric hanging down adds extra weight exactly where you don’t want it.
- Working both ends at once on wide blinds. This causes the headrail to swing and knock against the frame. Always finish one side before starting the other.
- Ignoring stuck screws. Forcing a rusted or paint-sealed screw often strips it. A little penetrating oil and patience beats brute force.
- Not labeling hardware. Mixing up brackets and screws between multiple windows turns reinstallation into a guessing game.
What to Do After the Blinds Are Down
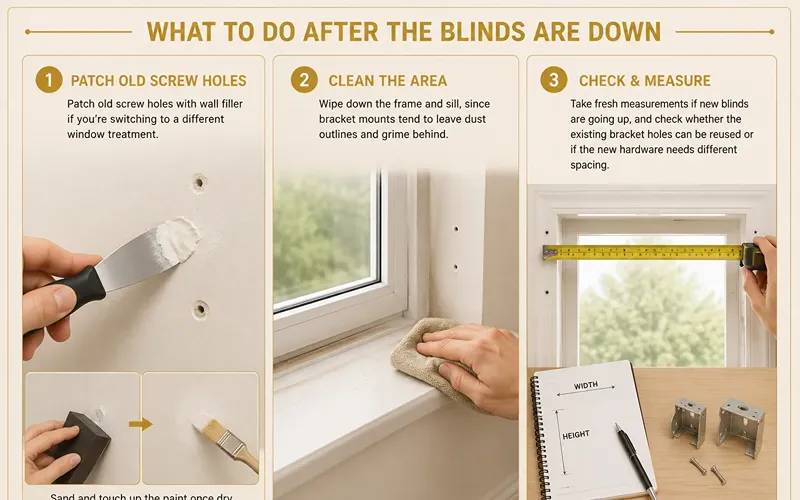
Once everything is off the window, a bit of cleanup makes the next step, whether that’s reinstalling, replacing, or repainting, much easier.
- Patch old screw holes with a small amount of wall filler if you’re switching to a different window treatment, then sand and touch up the paint once dry.
- Wipe down the frame and sill, since bracket mounts tend to leave dust outlines and grime behind.
- Take fresh measurements if new blinds are going up, and check whether the existing bracket holes can be reused or if the new hardware needs different spacing.
DIY Removal vs. Calling a Professional
| Factor | DIY Removal | Professional Removal |
| Cost | Free (just your time) | Service fee applies |
| Speed | Slower if it’s your first time | Fast, done in minutes |
| Damage risk | Higher without experience | Minimal |
| Best suited for | Lightweight, standard blinds | Heavy, oversized, or motorized systems |
| Safety | Ladder and height risk | Trained, insured technicians |
For a single set of lightweight roller or venetian blinds, DIY removal is usually quick and painless. For large motorized systems, oversized picture windows, or blinds mounted well above reach, bringing in a professional is often the safer call.
Final Thoughts
Removing blinds isn’t complicated once you understand the underlying process, raise the blind, locate the bracket, release it carefully, and support the weight as it comes free. The specifics vary slightly between roller, vertical, venetian, roman, cellular, and motorized styles, but the core method stays consistent across nearly every window covering on the market. With the right tools and a little patience for stubborn brackets, you can remove any blind in your home cleanly, safely, and without damaging your walls.
Frequently Asked Questions
Do I need to remove the brackets, or just the blind itself?
Not always. If you’re planning to reinstall the same blinds later, or install a same-size replacement, you can often leave the brackets mounted and only detach the headrail.
Why won’t my blinds release from the bracket?
It’s usually one of two things, either the bracket is spring-loaded and needs to be pushed toward the window before it will tilt out, or a hidden secondary clip is still engaged somewhere along the headrail.
Can I remove blinds without a ladder?
For blinds mounted at standard window height, yes. For anything above shoulder height, a step stool or ladder is strongly recommended for both safety and control over the blind’s weight.
Is it normal for old blinds to be harder to remove than new ones?
Yes. Paint buildup, dust, and rust on screws and clips can make older brackets stiffer. A little WD-40 or similar spray on stuck hardware usually loosens things up within a few minutes.
What’s the safest way to remove heavy wood blinds?
Always support the headrail with one hand before releasing the second bracket, and consider having a second person hold the opposite end — wood blinds are noticeably heavier than aluminum or fabric options and can crack if dropped.


